top of page

Sweetheart Neckline Doll Dress Sewing tutorial

  • Writer: Bankky N.
    Bankky N.
  • 1 hour ago
  • 3 min read

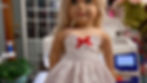
I’m so excited to share this Sweetheart Neckline Doll Dress tutorial with you! This design started as a little creative playtime—experimenting with scraps, adjusting the pattern, and having fun with details like gathers, ribbon, and lace. Even though it’s a simple build, the sweetheart neckline adds a soft, elegant touch that makes this dress extra special.


This tutorial is beginner-friendly and perfect for anyone who loves sewing doll clothes, You can easily customize it with trims, contrast fabrics, or keep it simple for everyday doll wear. Best of all, it works beautifully for both 18-inch and 14–14.5-inch dolls, making it a versatile addition to your doll wardrobe.


🎁Free Printable patterns at the bottom of the page!


Video Tutorial


Materials Needed


  • Fabric for the dress (lightweight cotton, quilting cotton, or similar)

  • Lining fabric for the bodice

  • Coordinating thread

  • Erasable fabric marker or fabric pencil

  • Pins or sewing clips

  • Scissors or rotary cutter

  • Sewing machine

  • Iron and ironing board


Optional Decorations


  • Ribbon, lace, or trims

  • Small bow or embellishments


Closure Options


  • Hook-and-loop tape (Velcro)

  • OR small snaps


Step-by-Step Instructions


1. Mark & Trace


Mark the center of the back skirt seam.

Trace the bodice pattern onto the fabric using an erasable fabric marker.


2. Sew Bodice Front & Lining


Place the front bodice right sides together with the lining on top. Fold the bottom seam allowance of the bodice front upward, pin in place, and stitch.

3. Clip Curves


Clip along the curved edges and trim away excess seam allowance to reduce bulk.


4. Turn & Press


Turn the bodice right side out, press neatly, and set aside.


5. Sew Skirt Back Seam


With right sides together, stitch the back seam of the skirt.

6. Finish Back Seam


Fold the seam allowance inward
and stitch in place for a clean finish.


7. Hem Skirt


Fold and stitch the bottom hem of the skirt.

8. Gather Skirt


Sew a gathering stitch along the top edge of the skirt.


9. Attach Skirt to Bodice


Pin and evenly adjust the gathered skirt to the bodice lining, matching the center marks.

Stitch in place.
Stitch in place.

10. Remove Gathering Stitches


Carefully remove the visible gathering stitches.


11. Secure Bodice Bottom Edge


Secure Bodice Bottom Edge
Pin the bottom edge of the bodice over the skirt seam.
 and stitch in place.
and stitch in place.

12. Add Closure


Attach hook-and-loop tape or snaps to the back for the closure.

13. Decorate


Finish your dress by decorating with ribbon, lace, or trims as desired 🎀

I hope you enjoyed this tutorial! See you in the next one—happy crafting!


Was this tutorial helpful? Consider buying me a cup of coffee!

It will help cover the costs around here and encourage more free patterns and tutorial


14" dolls Free Printable pattern coming soon!


PATTERNS POLICY

Please feel free to use the patterns as you like and you don’t have to to give me any credit if you don’t want to, I just want to create patterns that are free and available for everyone, It’s will be my Honor if my creativity can be helpful to you in any way☺️


Thanks for stopping by

and allowing me to share a little of my passion

I Hope You Have a Lovely day!

And don't forget to Do more of what makes you happy!

HAPPY BANKKY / CRAFTY MOM

Don't Miss Out

Sign Up For More Craft Project!

©2024 by HAPPY BANKKY / CRAFTY MOM created with Wix.com

bottom of page