top of page

Doll Sewing 101: Start with the Basics Episode 6 - Basic Sleeveless Top

  • Writer: Bankky N.
    Bankky N.
  • 36 minutes ago
  • 3 min read

If you’re just beginning your doll sewing journey, you’ve come to the right place! Welcome to Episode 6 of my Doll Sewing 101: Start with the Basics series.


Today we’re making a Basic Sleeveless Top for 14-inch and 18-inch dolls. This project is simple, beginner-friendly, and only uses one pattern piece, making it a quick sew that’s perfect for building your doll’s wardrobe.


Whether you’re brand new to sewing or looking for an easy project, this top is a great way to practice sewing curves, working with a lining, and creating a clean finish.


🎁Free Printable patterns at the bottom of the page!
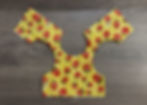


Pattern pieces


Pattern pieces
Pattern pieces


🧵 Materials


  • Basic Sleeveless Top PDF Pattern

  • Cotton fabric (Fat quarter)

  • Matching thread

  • Sewing machine or hand sew if preferred (Buy Here)

  • Fabric scissors

  • Pins or sewing clips

  • Turning tool Hemostat [Buy Here]

  • Iron

  • Hook-and-loop (Velcro) closure

  • Optional: Elastic Lace  [Buy Here]


📺 Watch the Full Video Tutorial


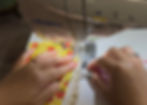
Step-by-Step Sewing Instructions


Step 1 – Cut the Fabric


Trace and cut the top pattern according to the pattern guide.

Cut:

  • 1 Main Fabric

  • 1 Lining


Step 2 – Stitch the Outer Edges


Place the main fabric and lining right sides together. Stitch Down one back edge, around the neckline then down the opposite back edge and then stitch armholes last, Leave the side seams and bottom edge open.


Step 3 – Clip the Curves


Clip the seam allowance around the neckline and armholes to help the curves lay flat after turning.
Trim the corners at the back edges to reduce bulk, Be careful not to cut through the stitching.


Step 4 – Turn Right Side Out


Using a locking clamp, turning tool, or hemostat.
Carefully pull the fabric through the shoulder opening. Gently shape the corners and curves, then press the top flat.


Repeat the other shoulder.
Right side out.
Right side out.


Step 5 – Stitch the Side Seams


Matching the seam
Matching the seam


Pin the bodice front and bodice back and lining together at the side seams.
Pin both side
Pin both side

After pin
After pin


Stitch each side in one continuous seam, joining both the main fabric and lining at the same time.


After stitch you got a nice clean finish look.


Step 6 – Prepare the Hem


Fold the bottom edge up ¼” (6 mm) toward the inside. Press to create a crisp hem.

After press.
After press.


Step 7 – Stitch the Hem (Optional Lace Trim)


For a decorative finish, place lace along the bottom edge.


Insert lace as you sew, Topstitch close to the folded edge to secure the hem (and lace, if using).


Step 8 – Add the Closure


Cut and stitch a 2½–3” (6.5–7.5 cm) piece of hook-and-loop tape to back opening.

Back of the sleeveless top.


Congratulations!


Your Basic Sleeveless Top is complete! (Front)


This quick and beginner-friendly project is a wonderful introduction to sewing lined garments. Best of all, it only uses one pattern piece, making it simple, fun, and easy to sew. Happy sewing! 🩷


Was this tutorial helpful? Consider buying me a cup of coffee!

It will help cover the costs around here and encourage more free patterns and tutorial


14" dolls Free Printable pattern Here!


18" dolls Free Printable pattern Here!


PATTERNS POLICY

Please feel free to use the patterns as you like and you don’t have to to give me any credit if you don’t want to, I just want to create patterns that are free and available for everyone, It’s will be my Honor if my creativity can be helpful to you in any way☺️


Thanks for stopping by

and allowing me to share a little of my passion

I Hope You Have a Lovely day!

And don't forget to Do more of what makes you happy!

HAPPY BANKKY / CRAFTY MOM

Don't Miss Out

Sign Up For More Craft Project!

©2024 by HAPPY BANKKY / CRAFTY MOM created with Wix.com

bottom of page